Loading...


Parts of box plots
Quiz by jennifer englebretson
Customize this quiz to suit your class
Instantly translate to 100+ languages
Tag the questions with any skills you have. Your dashboard will track each student's mastery of each skill.
Give this quiz to my class
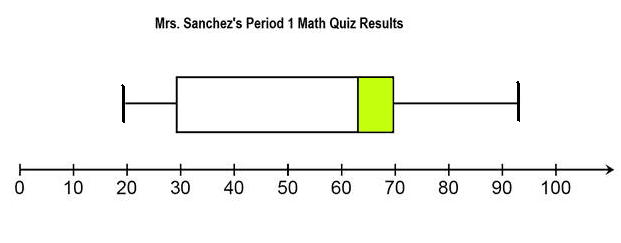
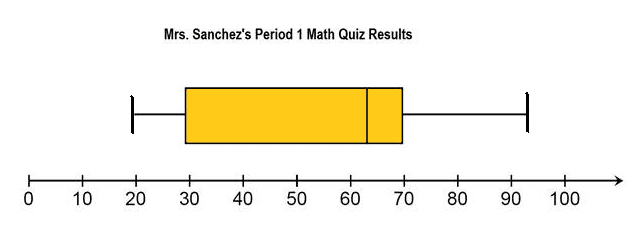
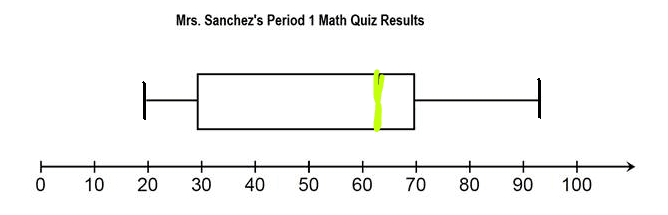
What is the yellow area called on the box and whisker plot shown?
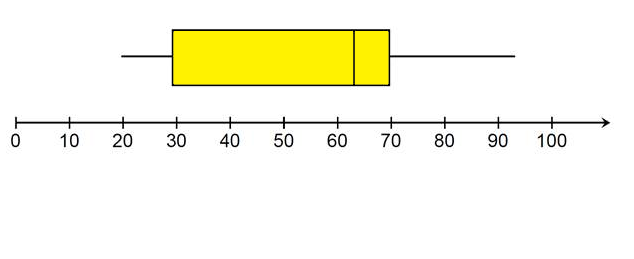
interquartile range
2nd quartile
1st quartile
3rd quartile
What do the two red lines represent on a box plot?
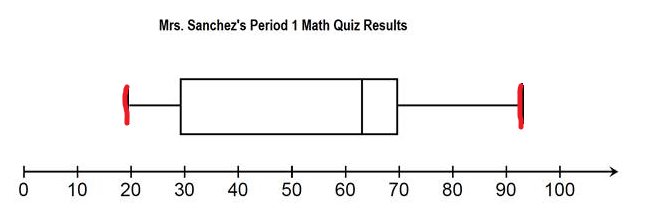
The median
the interquartile range
The highest and lowest numbers
the mode
What is the yellow area called on the box and whisker plot shown?
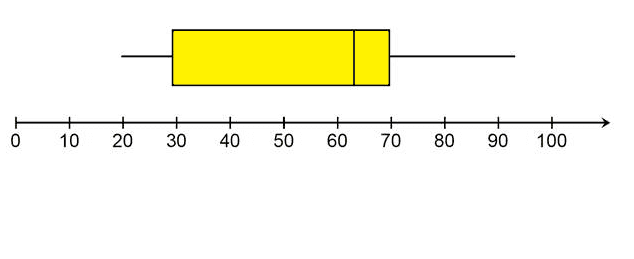
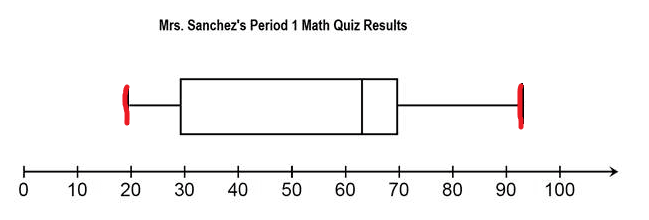
What do the two red lines represent on a box plot?
What does the green section represent?
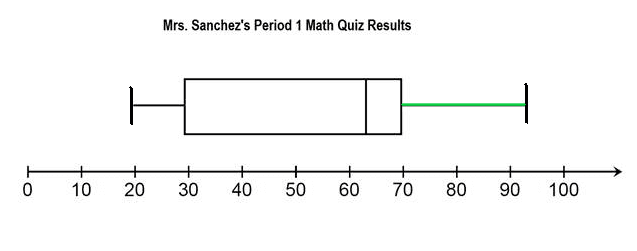
What does the green section represent?
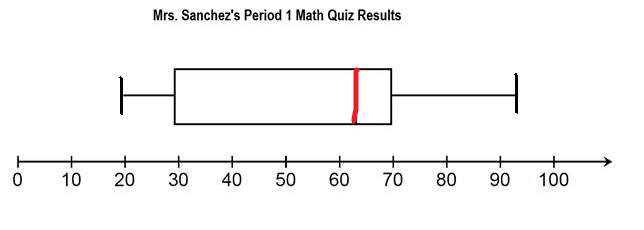
What does the red line represent?
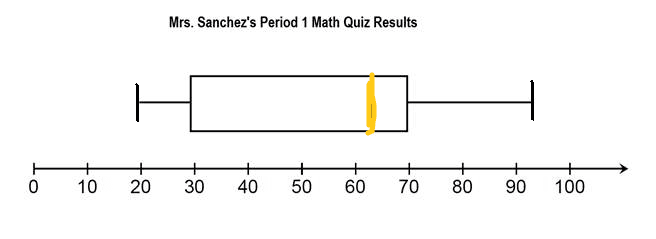
What does the yellow line represent?
What does the purple line represent?
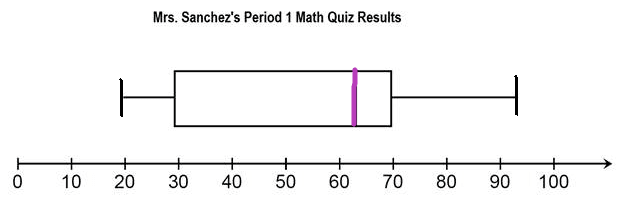
What does the red box represent
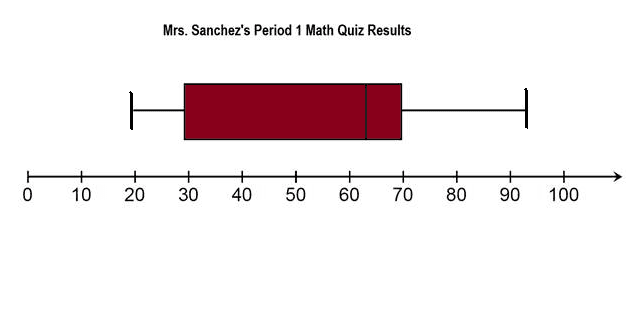
What does the yellow section represent?
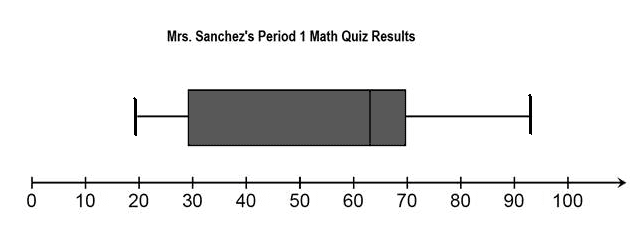
what does the grey region represent?
What does the yellow line represent?
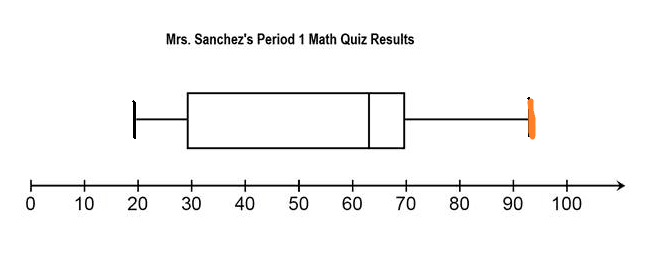
What does the pink line represents?
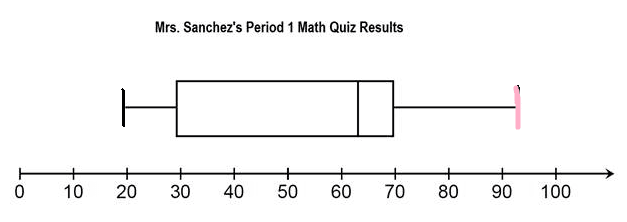
What does the red line represent?
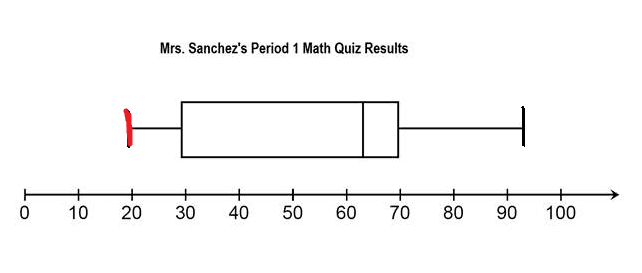
What does the blue line represent?
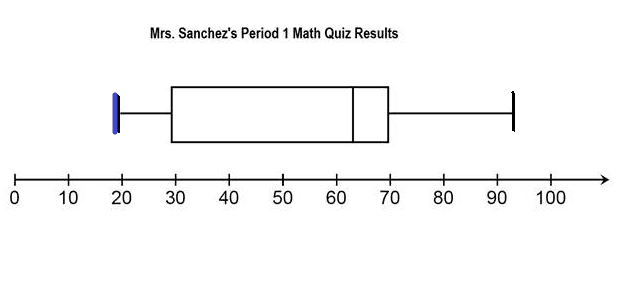
What does the green line represent?
What does the red section represent?
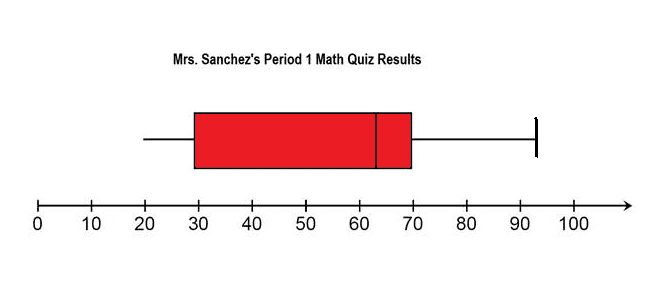
Which box plot is showing the median?
Which box plot is showing the interquartile range?
Which box plot is showing the median?
Which box plot is showing the minimum value?
Which box plot is showing the maximum value?
Create questions based on the following text Not long ago, I grabbed breakfast at a hotel in southern Spain. The only cereal available was a local version of frosted corn flakes, so I readied myself to enjoy a bowl of my childhood favorite. But my sweet indulgence wasn't what I'd expected: The cereal milk was heated — apparently standard in this part of Spain — and my poor frosted flakes immediately turned to mush. Not so grrrrrrreat. Soggy flakes or not, I find breakfast to be a fun part of my travel day, especially because the experience varies so much from one country's breakfast table to the next. The farther north you go in Europe, the heartier the breakfasts. The heaviest is the traditional British "fry." Also known as a "Plate of Cardiac Arrest," the fry is a fundamental part of the bed-and-breakfast experience, and is generally included in your room price. A standard fry comes with cereal or porridge, a fried egg, Canadian-style bacon or sausage (and sometimes mackerel or haggis), a grilled tomato, sautéed mushrooms, baked beans, and fried bread or toast. This protein-stuffed meal can tide me over until dinner. You'll quickly figure out which parts of the fry you like. Your host will likely ask you up front which breakfast items you actually like, rather than serve you the whole shebang and risk having to throw out uneaten food. The Scandinavian breakfasts buffet is the perennial favorite for the "most food on the table" award. It pays to take advantage of breakfast smorgasbords when you can. For about $20 (a cheap meal in these parts), you can dig into an all-you-can-eat extravaganza of fresh bread, cheeses, yogurt, cereal, boiled eggs, herring, cold cuts, and coffee or tea. In place of cereal and milk, Scandinavians like to pour thick yogurt over their granola. Throughout the Netherlands, Belgium, Germany, Austria, Switzerland, and most points east of there, expect a more modest buffet — but still plenty of options (rolls, bread, jam, cold cuts, cheeses, fruit, yogurt, and cereal). In these countries, there's a good chance of finding hard-boiled eggs, but scrambled or fried eggs are relatively rare. In Poland, track down jajecznica, the local wake-up call of eggs scrambled with kielbasa sausage, served with a side of potato pancakes. The breakfast of choice in Russia is oladi, pancakes perfectly fried to be crisp on the outside but soft in the middle, then topped with sour cream, honey, or berries. Germans have an endearing habit of greeting others in the breakfast room with a slow and dour "Morgen" ("Morning" — short for "good morning"), though they have plenty to be happy about. Breakfast is usually included, and offers hearty fuel for the day: ham, eggs, cheese, bread, rolls, and pots of coffee. In Switzerland, don't miss an opportunity to try Bircher Muesli, a healthful mix of oats, nuts, yogurt, and fruit that tastes far more delicious than it looks. If breakfast is optional, take a walk to the nearest bakery — every German, Austrian, and Swiss town has at least a few bakeries offering a world of enticing varieties of bread and pastries, baked fresh every morning. As you move south and west (France, Italy, Spain, and Portugal), skimpier "continental" breakfasts are the norm. You'll mostly likely get a roll with marmalade or jam, occasionally a slice of ham or cheese, and coffee or tea. The good news? These little breakfasts compel you to sample regional favorites: In Spain, look for chocolate con churros (fritters served with a thick, warm chocolate drink), pan con tomate (a toasted baguette rubbed with fresh garlic and ripe tomato), or a tortilla española (a hearty slice of potato omelet). Italian breakfasts are particularly tiny, but the delicious red orange juice you get is made from Sicilian blood oranges. And you can buy a delightful toasted sandwich from a corner bar anywhere, anytime in Italy to make up for the minuscule breakfast. In France, locals just grab a warm croissant and coffee on the way to work. Queue up with the French and consider the yummy options: croissants studded with raisins, packed with crushed almonds, or filled with chocolate or cream. If you expect breakfast to be too sparse, plan ahead to supplement it with a piece of fruit and a wrapped chunk of cheese from a local market. Being a juice man, I keep a liter box of OJ in my room for a morning eye-opener. Coffee drinkers know that breakfast is the only cheap time to caffeinate yourself. Some hotels will serve you a bottomless cup of a rich brew only with breakfast. After that, the cups acquire bottoms and refills will cost you. Juice is generally available at breakfast, but in Mediterranean countries, you have to ask…and you'll probably be charged. In many countries, breakfast is included in your hotel bill, though if you make prior arrangements with the hotelier, you may be able to skip breakfast and pay a lower price for the room. If breakfast costs extra, it's often optional, and you can usually save money and gain atmosphere by buying coffee and a roll or croissant at the café down the street or by brunching picnic-style in the park. When deciding whether to request breakfast, consider your timing; if you need to get an early start, skip the breakfast — few hotel breakfasts are worth waiting around for. Come to the European breakfast table with an adventurous spirit. I'm a big-breakfast traditionalist at home, but when I feel the urge for an American breakfast in Europe, I beat it to death with a hard roll.Not long ago, I grabbed breakfast at a hotel in southern Spain. The only cereal available was a local version of frosted corn flakes, so I readied myself to enjoy a bowl of my childhood favorite. But my sweet indulgence wasn't what I'd expected: The cereal milk was heated — apparently standard in this part of Spain — and my poor frosted flakes immediately turned to mush. Not so grrrrrrreat. Soggy flakes or not, I find breakfast to be a fun part of my travel day, especially because the experience varies so much from one country's breakfast table to the next. The farther north you go in Europe, the heartier the breakfasts. The heaviest is the traditional British "fry." Also known as a "Plate of Cardiac Arrest," the fry is a fundamental part of the bed-and-breakfast experience, and is generally included in your room price. A standard fry comes with cereal or porridge, a fried egg, Canadian-style bacon or sausage (and sometimes mackerel or haggis), a grilled tomato, sautéed mushrooms, baked beans, and fried bread or toast. This protein-stuffed meal can tide me over until dinner. You'll quickly figure out which parts of the fry you like. Your host will likely ask you up front which breakfast items you actually like, rather than serve you the whole shebang and risk having to throw out uneaten food. The Scandinavian breakfasts buffet is the perennial favorite for the "most food on the table" award. It pays to take advantage of breakfast smorgasbords when you can. For about $20 (a cheap meal in these parts), you can dig into an all-you-can-eat extravaganza of fresh bread, cheeses, yogurt, cereal, boiled eggs, herring, cold cuts, and coffee or tea. In place of cereal and milk, Scandinavians like to pour thick yogurt over their granola. Throughout the Netherlands, Belgium, Germany, Austria, Switzerland, and most points east of there, expect a more modest buffet — but still plenty of options (rolls, bread, jam, cold cuts, cheeses, fruit, yogurt, and cereal). In these countries, there's a good chance of finding hard-boiled eggs, but scrambled or fried eggs are relatively rare. In Poland, track down jajecznica, the local wake-up call of eggs scrambled with kielbasa sausage, served with a side of potato pancakes. The breakfast of choice in Russia is oladi, pancakes perfectly fried to be crisp on the outside but soft in the middle, then topped with sour cream, honey, or berries. Germans have an endearing habit of greeting others in the breakfast room with a slow and dour "Morgen" ("Morning" — short for "good morning"), though they have plenty to be happy about. Breakfast is usually included, and offers hearty fuel for the day: ham, eggs, cheese, bread, rolls, and pots of coffee. In Switzerland, don't miss an opportunity to try Bircher Muesli, a healthful mix of oats, nuts, yogurt, and fruit that tastes far more delicious than it looks. If breakfast is optional, take a walk to the nearest bakery — every German, Austrian, and Swiss town has at least a few bakeries offering a world of enticing varieties of bread and pastries, baked fresh every morning. As you move south and west (France, Italy, Spain, and Portugal), skimpier "continental" breakfasts are the norm. You'll mostly likely get a roll with marmalade or jam, occasionally a slice of ham or cheese, and coffee or tea. The good news? These little breakfasts compel you to sample regional favorites: In Spain, look for chocolate con churros (fritters served with a thick, warm chocolate drink), pan con tomate (a toasted baguette rubbed with fresh garlic and ripe tomato), or a tortilla española (a hearty slice of potato omelet). Italian breakfasts are particularly tiny, but the delicious red orange juice you get is made from Sicilian blood oranges. And you can buy a delightful toasted sandwich from a corner bar anywhere, anytime in Italy to make up for the minuscule breakfast. In France, locals just grab a warm croissant and coffee on the way to work. Queue up with the French and consider the yummy options: croissants studded with raisins, packed with crushed almonds, or filled with chocolate or cream. If you expect breakfast to be too sparse, plan ahead to supplement it with a piece of fruit and a wrapped chunk of cheese from a local market. Being a juice man, I keep a liter box of OJ in my room for a morning eye-opener. Coffee drinkers know that breakfast is the only cheap time to caffeinate yourself. Some hotels will serve you a bottomless cup of a rich brew only with breakfast. After that, the cups acquire bottoms and refills will cost you. Juice is generally available at breakfast, but in Mediterranean countries, you have to ask…and you'll probably be charged. In many countries, breakfast is included in your hotel bill, though if you make prior arrangements with the hotelier, you may be able to skip breakfast and pay a lower price for the room. If breakfast costs extra, it's often optional, and you can usually save money and gain atmosphere by buying coffee and a roll or croissant at the café down the street or by brunching picnic-style in the park. When deciding whether to request breakfast, consider your timing; if you need to get an early start, skip the breakfast — few hotel breakfasts are worth waiting around for. Come to the European breakfast table with an adventurous spirit. I'm a big-breakfast traditionalist at home, but when I feel the urge for an American breakfast in Europe, I beat it to death with a hard roll. Can you make 5 questions based on the textTranslator: Joseph Geni Reviewer: Morton Bast Before March, 2011, I was a photographic retoucher based in New York City. We're pale, gray creatures. We hide in dark, windowless rooms, and generally avoid sunlight. We make skinny models skinnier, perfect skin more perfect, and the impossible possible, and we get criticized in the press all the time, but some of us are actually talented artists with years of experience and a real appreciation for images and photography. On March 11, 2011, I watched from home, as the rest of the world did, as the tragic events unfolded in Japan. Soon after, an organization I volunteer with, All Hands Volunteers, were on the ground, within days, working as part of the response efforts. I, along with hundreds of other volunteers, knew we couldn't just sit at home, so I decided to join them for three weeks. On May the 13th, I made my way to the town of Ōfunato. It's a small fishing town in Iwate Prefecture, about 50,000 people, one of the first that was hit by the wave. The waters here have been recorded at reaching over 24 meters in height, and traveled over two miles inland. As you can imagine, the town had been devastated. We pulled debris from canals and ditches. We cleaned schools. We de-mudded and gutted homes ready for renovation and rehabilitation. We cleared tons and tons of stinking, rotting fish carcasses from the local fish processing plant. We got dirty, and we loved it. For weeks, all the volunteers and locals alike had been finding similar things. They'd been finding photos and photo albums and cameras and SD cards. And everyone was doing the same. They were collecting them up, and handing them in to various places around the different towns for safekeeping. Now, it wasn't until this point that I realized that these photos were such a huge part of the personal loss these people had felt. As they had run from the wave, and for their lives, absolutely everything they had, everything had to be left behind. At the end of my first week there, I found myself helping out in an evacuation center in the town. I was helping clean the onsen, the communal onsen, the huge giant bathtubs. This happened to also be a place in the town where the evacuation center was collecting the photos. This is where people were handing them in, and I was honored that day that they actually trusted me to help them start hand-cleaning them. Now, it was emotional and it was inspiring, and I've always heard about thinking outside the box, but it wasn't until I had actually gotten outside of my box that something happened. As I looked through the photos, there were some were over a hundred years old, some still in the envelope from the processing lab, I couldn't help but think as a retoucher that I could fix that tear and mend that scratch, and I knew hundreds of people who could do the same. So that evening, I just reached out on Facebook and asked a few of them, and by morning the response had been so overwhelming and so positive, I knew we had to give it a go. So we started retouching photos. This was the very first. Not terribly damaged, but where the water had caused that discoloration on the girl's face had to be repaired with such accuracy and delicacy. Otherwise, that little girl isn't going to look like that little girl anymore, and surely that's as tragic as having the photo damaged. (Applause) Over time, more photos came in, thankfully, and more retouchers were needed, and so I reached out again on Facebook and LinkedIn, and within five days, 80 people wanted to help from 12 different countries. Within two weeks, I had 150 people wanting to join in. Within Japan, by July, we'd branched out to the neighboring town of Rikuzentakata, further north to a town called Yamada. Once a week, we would set up our scanning equipment in the temporary photo libraries that had been set up, where people were reclaiming their photos. The older ladies sometimes hadn't seen a scanner before, but within 10 minutes of them finding their lost photo, they could give it to us, have it scanned, uploaded to a cloud server, it would be downloaded by a gaijin, a stranger, somewhere on the other side of the globe, and it'd start being fixed. The time it took, however, to get it back is a completely different story, and it depended obviously on the damage involved. It could take an hour. It could take weeks. It could take months. The kimono in this shot pretty much had to be hand-drawn, or pieced together, picking out the remaining parts of color and detail that the water hadn't damaged. It was very time-consuming. Now, all these photos had been damaged by water, submerged in salt water, covered in bacteria, in sewage, sometimes even in oil, all of which over time is going to continue to damage them, so hand-cleaning them was a huge part of the project. We couldn't retouch the photo unless it was cleaned, dry and reclaimed. Now, we were lucky with our hand-cleaning. We had an amazing local woman who guided us. It's very easy to do more damage to those damaged photos. As my team leader Wynne once said, it's like doing a tattoo on someone. You don't get a chance to mess it up. The lady who brought us these photos was lucky, as far as the photos go. She had started hand-cleaning them herself and stopped when she realized she was doing more damage. She also had duplicates. Areas like her husband and her face, which otherwise would have been completely impossible to fix, we could just put them together in one good photo, and remake the whole photo. When she collected the photos from us, she shared a bit of her story with us. Her photos were found by her husband's colleagues at a local fire department in the debris a long way from where the home had once stood, and they'd recognized him. The day of the tsunami, he'd actually been in charge of making sure the tsunami gates were closed. He had to go towards the water as the sirens sounded. Her two little boys, not so little anymore, but her two boys were both at school, separate schools. One of them got caught up in the water. It took her a week to find them all again and find out that they had all survived. The day I gave her the photos also happened to be her youngest son's 14th birthday. For her, despite all of this, those photos were the perfect gift back to him, something he could look at again, something he remembered from before that wasn't still scarred from that day in March when absolutely everything else in his life had changed or been destroyed. After six months in Japan, 1,100 volunteers had passed through All Hands, hundreds of whom had helped us hand-clean over 135,000 photographs, the large majority — (Applause) — a large majority of which did actually find their home again, importantly. Over five hundred volunteers around the globe helped us get 90 families hundreds of photographs back, fully restored and retouched. During this time, we hadn't really spent more than about a thousand dollars in equipment and materials, most of which was printer inks. We take photos constantly. A photo is a reminder of someone or something, a place, a relationship, a loved one. They're our memory-keepers and our histories, the last thing we would grab and the first thing you'd go back to look for. That's all this project was about, about restoring those little bits of humanity, giving someone that connection back. When a photo like this can be returned to someone like this, it makes a huge difference in the lives of the person receiving it. The project's also made a big difference in the lives of the retouchers. For some of them, it's given them a connection to something bigger, giving something back, using their talents on something other than skinny models and perfect skin. I would like to conclude by reading an email I got from one of them, Cindy, the day I finally got back from Japan after six months. "As I worked, I couldn't help but think about the individuals and the stories represented in the images. One in particular, a photo of women of all ages, from grandmother to little girl, gathered around a baby, struck a chord, because a similar photo from my family, my grandmother and mother, myself, and newborn daughter, hangs on our wall. Across the globe, throughout the ages, our basic needs are just the same, aren't they?" Thank you. (Applause) (Applause)Plant cells have three kinds of structures that are not found in animal cells and that are extremely important to plant survival: plastids, central vacuoles, and cell walls. PLANT CELLS Most of the organelles and other parts of the cell just described are common to all eukaryotic cells. However, plant cells have three additional kinds of structures that are extremely important to plant function: cell walls, large central vacuoles, and plastids. To understand why plant cells have structures not found in ani- mal cells, consider how a plant’s lifestyle differs from an animal’s. Plants make their own carbon-containing molecules directly from carbon taken in from the environment. Plant cells take carbon diox- ide gas from the air, and in a process called photosynthesis, they convert carbon dioxide and water into sugars. The organelles and structures in plant cells are shown in Figure 4-21. SECTION 4 OBJECTIVES ● List three structures that are present in plant cells but not in animal cells. ● Compare the plasma membrane, the primary cell wall, and the secondary cell wall. ● Explain the role of the central vacuole. ● Describe the roles of plastids in the life of a plant. ● Identify features that distinguish prokaryotes, eukaryotes, plant cells, and animal cells. VOCABULARY cell wall central vacuole plastid chloroplast thylakoid chlorophyll Chloroplast Golgi apparatus Mitochondrion Cell membrane Nucleolus Nucleus Cytoskeleton Rough endoplasmic reticulum Pore Smooth endoplasmic reticulum Central vacuole Ribosome Cell wall In addition to containing almost all of the types of organelles that animal cells contain, plant cells contain three unique features. Those features are the cell wall, the central vacuole, and plastids, such as chloroplasts. FIGURE 4-21 Copyright © by Holt, Rinehart and Winston. All rights reserved. 88 CHAPTER 4 CELL WALL The cell wall is a rigid layer that lies outside the cell’s plasma membrane. Plant cell walls contain a carbohydrate called cellulose. Cellulose is embedded in a matrix of proteins and other carbohy- drates that form a stiff box around each cell. Pores in the cell wall allow water, ions, and some molecules to enter and exit the cell. Primary and Secondary Cell Walls The main component of the cell wall, cellulose, is made directly on the surface of the plasma membrane by enzymes that travel along the membrane. These enzymes are guided by microtubules inside the plasma membrane. Growth of the primary cell wall occurs in one direction, based on the orientation of the microtubules. Other components of the cell wall are made in the ER. These materials move in vesicles to the Golgi and then to the cell surface. Some plants also produce a secondary cell wall. When the cell stops growing, it secretes the secondary cell wall between the plasma membrane and the primary cell wall. The secondary cell wall is very strong but can no longer expand. The wood in desks and tabletops is made of billions of secondary cell walls. The cells inside the walls have died and disintegrated. CENTRAL VACUOLE Plant cells may contain a reservoir that stores large amounts of water. The central vacuole is a large, fluid-filled organelle that stores not only water but also enzymes, metabolic wastes, and other materials. The central vacuole, shown in Figure 4-22, forms as other smaller vacuoles fuse together. Central vacuoles can make up 90 percent of the plant cell’s volume and can push all of the other organelles into a thin layer against the plasma membrane. When water is plentiful, it fills a plant’s vacuoles. The cells expand and the plant stands upright. In a dry period, the vacuoles lose water, the cells shrink, and the plant wilts. Other Vacuoles Some vacuoles store toxic materials. The vacuoles of acacia trees, for example, store poisons that provide a defense against plant-eating ani- mals. Tobacco plant cells store the toxin nicotine in a storage vacuole. Other vacuoles store plant pigments, such as the colorful pigments found in rose petals. The central vacuole occupies up to 90 percent of the volume of some plant cells. The central vacuole stores water and helps keep plant tissue firm. FIGURE 4-22 Central vacuole Nucleus Chloroplast Copyright © by Holt, Rinehart and Winston. All rights reserved. CELL STRUCTURE AND FUNCTION 89 PLASTIDS Plastids are another unique feature of plant cells. Plastids are organelles that, like mitochondria, are surrounded by a double mem- brane and contain their own DNA. There are several types of plastids, including chloroplasts, chromoplasts, and leucoplasts. Chloroplasts Chloroplasts use light energy to make carbohydrates from carbon dioxide and water. As Figure 4-23 shows, each chloroplast contains a system of flattened, membranous sacs called thylakoids. Thylakoids contain the green pigment chlorophyll, the main mole- cule that absorbs light and captures light energy for the cell. Chloroplasts can be found not only in plant cells but also in a wide variety of eukaryotic algae, such as seaweed. Chloroplast DNA is very similar to the DNA of certain photosyn- thetic bacteria. Plant cell chloroplasts can arise only by the divi- sion of preexisting chloroplasts. These facts may suggest that chloroplasts are descendants of ancient prokaryotic cells. Like mitochondria, chloroplasts are also thought to be the descendants of ancient prokaryotic cells that were incorporated into plant cells through a process called endosymbiosis. Chromoplasts Chromoplasts are plastids that contain colorful pigments and that may or may not take part in photosynthesis. Carrot root cells, for example, contain chromoplasts filled with the orange pigment carotene. Chromoplasts in flower petal cells contain red, purple, yellow, or white pigments. Other Plastids Several other types of plastids share the general features of chloro- plasts but differ in content. For example, amyloplasts store starch. Chloroplasts, chromoplasts, and amyloplasts arise from a common precursor, called a proplastid. Thylakoid Inner membrane Outer membrane chloroplast from the Greek chloros, meaning “pale green,” and plastos, meaning “formed” Word Roots and Origins A chloroplast captures energy from sunlight and uses that energy to convert carbon dioxide and water into sugar and other carbohydrates. FIGURE 4-23 Copyright © by Holt, Rinehart and Winston. All rights reserved. 90 CHAPTER 4 COMPARING CELLS All cells share common features, such as a cell membrane, cyto- plasm, ribosomes, and genetic material. But there is a high level of diversity among cells, as shown in Figure 4-24. There are signifi- cant differences between prokaryotes and eukaryotes. In addition, plant cells have features that are not found in animal cells. Prokaryotes Versus Eukaryotes Prokaryotes differ from eukaryotes in that prokaryotes lack a nucleus and membrane-bound organelles. Prokaryotes have a region, called a nucleoid, in which their genetic material is concen- trated. However, prokaryotes lack an internal membrane system. Plant Cells Versus Animal Cells Three unique features distinguish plant cells from animal cells. One is the production of a cell wall by plant cells. Plant cells contain a large central vacuole. Third, plant cells contain a variety of plastids, which are not found in animal cells. Cell walls, central vacuoles, and plastids are unique features that are important to plant function. 1. Identify three unique features of plant cells. 2. List the differences between the plasma mem- brane, the primary cell wall, and the secondary cell wall. 3. Identify three functions of plastids. 4. Name three things that may be stored in vacuoles. 5. Describe the features that distinguish prokary- otes from eukaryotes and plant cells from animal cells. CRITICAL THINKINGCell Theory The microscopes we use today are far more complex than those used in the 1600s by Antony van Leeuwenhoek, a Dutch shopkeeper who had great skill in crafting lenses. Despite the limitations of his now-ancient lenses, van Leeuwenhoek observed the movements of protista (a type of single-celled organism) and sperm, which he collectively termed “animalcules. ” In a 1665 publication called Micrographia, experimental scientist Robert Hooke coined the term “cell” for the box-like structures he observed when viewing cork tissue through a lens. In the 1670s, van Leeuwenhoek discovered bacteria and protozoa. Later advances in lenses, microscope construction, and staining techniques enabled other scientists to see some components inside cells. image Figure 4.3.1 : Structure of an Animal Cell: The cell is the basic unit of life and the study of the cell led to the development of the cell theory. By the late 1830s, botanist Matthias Schleiden and zoologist Theodor Schwann were studying tissues and proposed the unified cell theory. The unified cell theory states that: all living things are composed of one or more cells; the cell is the basic unit of life; and new cells arise from existing cells. Rudolf Virchow later made important contributions to this theory. Schleiden and Schwann proposed spontaneous generation as the method for cell origination, but spontaneous generation (also called abiogenesis) was later disproven. Rudolf Virchow famously stated “Omnis cellula e cellula”… “All cells only arise from pre-existing cells. “The parts of the theory that did not have to do with the origin of cells, however, held up to scientific scrutiny and are widely agreed upon by the scientific community today. The generally accepted portions of the modern Cell Theory are as follows: The cell is the fundamental unit of structure and function in living things. All organisms are made up of one or more cells. Cells arise from other cells through cellular division. The expanded version of the cell theory can also include: Cells carry genetic material passed to daughter cells during cellular division All cells are essentially the same in chemical composition Energy flow (metabolism and biochemistry) occurs within cellsNumber Twelve Number Twelve Is Everywhere! We use the number twelve to help us do things every day. It helps us to count things, measure length, and tell time. Did you ever wonder why a year has twelve months? A ruler has twelve inches? A clock has twelve hours? How We Learned to Count. Long ago, people needed an easy way to count things. How many goats did they have? How many bricks did they need? They didn't have pencils, but they always had their fingers. How could their fingers help them count things? Your hand has four fingers and one thumb. Fingers bend into three parts. All of your finger parts add up to-twelve! To learn how people counted, use the thumb of your other hand. Count the parts of each finger. One, two, three, four, five, six. Using their fingers, people could count their farm animals. They might count six chickens, three sheep, and three goats. They had twelve animals! When their animals had babies, it was easy to count them, too. Using both hands, people could count to twenty-four. Twenty-four is two twelves! A Ruler Is Twelve Thumbs Long Fingers, and the number twelve, were also used to find length. An inch was the width of an adult man's thumb. A foot was twelve thumbs long. Soon, people cut twelve marks for thumb widths on a stick. It was easy to carry the stick. That stick was the first kind of twelve-inch ruler! Twelve Hours in a Day People used the number twelve to divide their days into parts, or hours, that they could count. In daylight, they watched the shadow of a stick or a sundial to know what hour it was. Twelve things are also called a dozen. We buy a dozen pencils in a box. We buy a dozen doughnuts or a dozen eggs. The number twelve helps us to do a dozen things every day! Align Panel: This panel allows you to align one or more objects the the artboard or other objects. Alignment: Formatting the appearance of text with the margins of the text box. Anchor Point Tool: Allows you to add or remove handles to create a curve on an anchor point. Anchor Points: A point on a path indicates a change of direction. Appearance Panel: This panel shows you the fill, strokes, graphic styles, and effects that have been applied to an object, group or layer and are able to modify theses from this panel directly. Area Type Tool: This occurs when using the type tool and you click and drag a text box, the text will automatically wrap inside the box. Blend Tool: This tool allows you to combine shapes/colors between two or more objects to create a new object between the original, blending the colors and shapes by inserting the middle steps to get from one object to the next. Blob Brush Tool: This tool is used to create free-form objects that can have a more hand-drawn feel. Brushes: Allows you to set the appearance/style of a path, can be applied to existing paths or used to create new paths. Clipping Masks: This command allows you to mask objects to a shape so that only areas that lie within the shape are visible, the mask and objects that are masked are called a clipping set. Closed Path: A path that has the same beginning and ending point. It forms a complete shape that can be filled with color or text. Create Outlines: This command converts text to closed paths and can be found in the Type Menu. Curvature Pen Tool: Allows you to simply create paths with curved anchor points. Curves: Can be applied to an anchor point using handles to create an arched line. Direct Select Tool: Allows you to select individual points of any path. Effects: These can be added to objects to create quick dynamic characteristics. Eraser Tool: This tool allows you to remove anchor points and cut through paths. Expand Objects: This allows you to divide a single object into multiple objects that make up its appearance. Eyedropper Tool: This tool allows you to sample the color or text from an existing part of the artwork. Global Swatches: This is a color swatches that will be automatically updated throughout your artwork when you change them, indicated with a white triangle in the corner of the swatch. Graphic Styles: A set of reusable appearance attributes that allow you to quickly change the look of an object. Grouping: This command allows you to link objects together so that they can be moved, scaled, rotator, or copy. Groups can be nested inside other groups. Hierarchy: To create visual order in design, controlling what the viewer looks at in order using size, color, contrast, etc… Image Trace: This command allows you to convert a raster image into a vector artwork. Isolation Mode: This mode allows you to adjust single objects/groups inside a group without ungrouping the group. Join Tool: This tool joins paths and anchor points together quickly. Kerning: This is the adjustment of the space between two individual letters. Knife Tool: This tool allows you to split an object into 2 pieces along a freehand path you draw. Leading: This is the adjustment of the space between lines of text. Live Corners: This widget appears when using the Direct Select tool and a corner is selected, when used this will create a rounded corner. Live Paint: This command allows you to quickly apply colors to objects in a complex design. Open Path: A path that does not end, not connected back to the original anchor point. Overflow Text: This occurs when the text box is too small to house all the text and is indicated by a small red plus sign in the bottom right corner of the text box. Paintbrush Tool: This tool is used to create free-form paths that can have a more hand-drawn feel. Paragraph Spacing: The space that occurs between lines of text. Pathfinder Panel: This panel allows you to create complex shapes by selecting 2 or more objects and using the buttons in the panel to cut, combine, or divide the objects. Paths: These are created when 2 or more points are connected, these are created using the pen tool. Pen Tool: It allows you to create and edit anchor points and paths. Pencil Tool: This tool is used to create free-form shapes or lines, the accuracy of the lines can be adjusted. Perspective Tool: This tool allows you to place elements on a perspective grid to adjust objects on a different perspective, automatically snapping to the perspective grid. Placeholder Text: Text that is placed in a text box that "holds a place" in a design to allow for creating a layout or adjust the text design. Point Type Tool: This occurs when when using the type tool and you click once, the text will continue without wrapping. Readability: The characteristics of fonts and styles that make test easy to identify and read. Scale, Shear, Distort Objects: This set of commands allows you to adjust the size and perspective of objects. Scissors Tool: This tool allows you to split a path into 2 pieces. Selection Tool: Allows you to select paths, objects or groups by click or dragging over them. Shape Builder Tool: This interactive tool allows you to create complex shapes by merging and erasing simpler objects. Shapes Tools: A group of tools to create basic shapes without using the pen tool (rectangle, ellipse, polygon, star, etc…). Smooth Tool: This tool will smooth a complex path and reduce the number of anchor points. Swatches: This is a saved color that can be applied in a design via the swatches panel and can be grouped, these can include gradients and patterns. Text Wrapping: This is when the text in a text box automatically wraps to the next line when it reaches the edge of the box. Threading Text: This is the ability to create 2 or more text boxes that are linked, when text is added/adjusted in one box, it will affect the other(s). Touch Type Tool: This tool allows you to adjust individual letter in a previously created text box. Tracking: This is the adjustment of the overall spacing between letters. Transform Objects: This allows you to change the size of objects. Type on a Path Tool: This tool allows you to add text along any previously created path. Type Tool: This tool allows you to create text in a design. View Modes: Ability to view projects and adjust the display on the screen. Modes include Outlines, Presentation, & Full Screen.Make mcq quiz with 4 option in which one is correct -'10 Basis of Material Science • .....;;;";;;"~~;;,,;;,,,,;.;.,,;;,,,;,,;.;,.,------------ 6. Temporary materials: Some materials are meant to be placed in the oral cavity for a short period of time for different reasons. • Temporary crowns: While a permanent crown is prepared in the dental laboratory, the patient must wait for few days before it can be fabricated and cemented into place. Does patient experience any problems during this time period? If the tooth is vital (the pulp is alive), the patient is likely to experience pain and sensitivity while eating and drinking, also it looks unesthetic. What can be done to solve this problem? A temporary crown is placed before the patient leaves the clinic. It is constructed and luted in the same appointment in which the crown preparation is done. Temporary crowns are not very strong or esthetic but they serve adequately till the permanent crown is ready to be cemented. • Temporary restorations: Sometimes it is difficult to decide immediately the best line of treatment for a particular tooth. The exact condition of the pulp may not be obvious to the dentist from the patient's symptoms. A dentist removes all or part of the decay and then places a temporary restoration to have time to observe the behaviour of the pulp or to give the pilip time to heal before deciding the further treatment required. Classification based on Location of Fabrication 4,9 Materials can be classified based on the location of fabrication into: • Direct restorative materials. • Indirect restorative materials Direct restorative materials: They include those materials which are used to restore cavity preparations directly in the oral cavity (Box 1.5). Box 1.5: Examples of direct restorative materials Amalgam, composites, glass ionomer and other materials, which set by chemical reactions in the mouth. Indirect restorative materials: It includes those restorations which must be fabricated outside the mouth, indirectly on a cast/ model/ die, because their processing condition would harm oral tissues. Materials used in the construction of such prosthesis are called indirect restorative materials (Box 1.6). Box 1.6: Examples of indirect restorative materials Gold inlays, crowns of metal, ceramic and polymers, which are processed at elevated temperatures. Some indirect composite restorations can be processed under specific wavelength of light, e.g. Ceramage. Classification based on Longevity of Use 1. Permanent restorations: These restorations are not planned to be replaced for a particular time period. Though they are referred to as permanent, actually they are not, e.g. fillings, crowns, bridges and dentures do not last forever (Fig. 1.5). 2. Temporary restorations: These restorations are planned to be replaced in a short period of time, such as few days to weeks. For ~ Permanent C/) c c -.2 0 c- :;::; Cll co Interim ~ Q; 0 .8ll::1iJ C/) o~ Cll a:: c:=:J Temporary Time period Fig. 1.5: Diagram depicting the time period of use of a restoration. (Arrow in permanent restoration depicts that such restorations are not planned to be replaced for a long period of time.) Introducton to Dental Materials Dental materials Box 1.7: Characteristics of metals 1. High thermal and electrical conductivity 2. Ductility (pure metals are very soft and they can be bent without breaking) 3. Opacity (they do not transmit light) 4. Luster (they have a surface that strongly reflects light and appears bright and shiny) 5. They tend to dissolve to some extent in water or other aqueous solutions, producing cations. 6. All metals are white (actually gray) except for gold, which is yellow, and copper, which is reddish. 7. All metals are solid at room temperature except mercury, which is liquid at room temperature and is used with silver alloys as amalgam. 8. All metals have high melting temperatures because of high strength of the metallic bond that holds the atoms together. 3. Polymers 4. Composites Composites are mixtures of two or more of the first three classes in which the different components remain distinct from one another in the final structure. A common example is composite resin. Fig. 1.7a: Three-dimensional structure of iron (metal) Metals Metals are the oldest of the three classes of materials that have been used as dental materials. Metals are characterized by metallic bonds (Box 1.7) which will be discussed in the next chapter. Metals solidify with their atoms in a regular or crystalline arrangement (see Chapter 2), often in the form of a cube (Fig. 1.7a). example, temporary fillings done in a tooth during root canal treatment, which have to be replaced within 2-4 days during subsequent visits. They are used to protect the tooth and provide function till the final restoration is done. 3. Interim restoration: At times, dental treatment requires "long-term" definite temporary restorations or "interim" restorations. For examle, a 7-year-old child, met with trauma and fractured one of his central incisors. A large composite build- up may serve his immediate requirement until the root formation is completed and a permanent crown is placed. 5 Classification based on the Chemical Nature of the Material These are the atoms that make up a material and the way they are bonded together determine the properties of that materiaLS Weak bonds make for weak materials and vice versa (Table 1.4). Materials can be classified into different categories based on their primary atomic bonds (Fig. 1.6): 1. Metals 2. Ceramics Fig. 1.6: Classification of dental materials based on chemical nature 12 Basis of Material Science Box 1.9: Benefits of ceramics in dentistry 1. Many ceramic oxides are used as pigmenting agents. These oxides produce good range of colors. Due to this characteristic, we are able to match almost any tooth color with good esthetic results. 2. They are inert, i.e. not chemically reactive. This quality provides ceramics with good bio- compatibility. 3. Ceramic materials are translucent, like natural teeth. This translucency gives the ceramic crown a more natural appearance than any other dental material. Fig. 1.7b: Internal arrangement of tetrahedral structure of ceramic (silica) four large oxygen atoms surround smaller silicon atom Ceramics A ceramic is a compound formed by the union of a metallic and a non-metallic element (Box 1.8). Most of these materials are oxides, formed by the union of oxygen with metals such as silicon, aluminum, calcium and magnesium (Fig.1.7b). Ceramics may be simple or complex. Examples of simple ceramics are alumina and silica. Examples of complex ceramics are feldspar (potassium aluminum silicate) and kaolin (hydrated aluminum silicate). Ceramics may be crystalline or non- crystalline (i.e. amorphous). Porcelain is a specific type of ceramic used extensively in dentistry (Box 1.9). Box 1.8: Characteristics of ceramics 1. High melting points. 2. Brittleness, which means they cannot be bent or deformed (no sliding) to any extent without actually cracking and breaking. 3. They are poor conductor of heat and electricity. 4. They are chemically inert. 5. They have excellent esthetic result in terms of matching natural teeth. Fig. 1.8: Stucture of synthetic polymer Polymers They are the latest addition (early to mid- 1900s) to dental materials. Most of the polymers are nowadays synthesized by humans. Polymers are giant, long-chain organic molecules (Fig. 1.8). Polymers are characterized by covalent bonds within each molecule, giving them tremendous strength in a single direction. Try to break a nylon rope by pulling it! They are poor conductors of heat and electri- city. Most polymers have a structure containing thousands of carbon atoms linked together like beads on a string. Others, such as silicone polymers are formed with silicon-oxygen bonds. Introducton to Dental Materials Table 1.4: Characteristics of different materials 13 Characteristics Bond Properties Crystal structure Metals Metallic bonding High strength and hardness, high electrical and thermal conductivity BCC, FCC, or HCP unit cells Ceramics Ionic or covalent bonding, or both High hardness and stiffness, electrically insulating, refractory, and chemically inert Crystalline or amorphous Polymers Covalent bonding Low sensitivity, high electrical resistivity, and low thermal conductivity, strength and stiffness vary widely Amorphous and crystalline Composites Composites are combinations of any of the basic ceramic, metallic and polymeric materials (Box 1.10). Each material that makes up composites is called a phase. Their properties tend to be somewhere between those of their basic constituents and are used to enhance their performance, longevity and handling chracterstics. Box 1.10: Types of composites in dentistry 1. Ceramic - metallic composite: Tungsten carbide bur. 2. Metal - polymer composite: Die materials in dental laboratory. 3. Ceramic - polymer composite: Enamel, dentin, bone and restorative composites. A composite is a kind of "combination" of materials, which compliment each other. The properties lacking in one material are compensated by those of the other material. For example, restorative composite has two phases, namely resin and fillers. Teeth and bones are examples of natural composites. Enamel is a composite of hydroxyapatite (which is a ceramic material) and protein (which is a polymer). EVALUATION OF DENTAL MATERIALS Most manufacturers of dental materials maintain a quality assurance programme (As per international standard like ADA specifications) and materials are thoroughly tested before being released into the market for dental practitioner (Fig. 1.9). Laboratory Evaluations Most ADA/ ANSI specifications involve laboratory tests. The tests performed as per these specifications are useful but they all are performed in vitro, (carried out in the laboratory away from the clinical conditions) which have a lot of limitations in clinical practice.lO Clinical Notes 1. For example, most of the direct restorative materials are tested for their compressive strength but ultimately the material is subjected to a combination of compressive, tensile and shear stresses, which may decide the final success or failure of the material under masticatory load. 2. Similarly upper dentures mostly fracture along the midline because of bending. Hence a bending or transverse strength ~B-a-s-is-o-f-M-a-t-e-ria-I-S~c-ie-n-c-e-------------- ---------. test is far more meaningful for denture base materials than a compression test. Clinical Trials The majority of new materials are subjected to extensive clinical trials normally in co-operation with a dental college or hospital departments prior to their release. CONCLUSION As the number of available materials is going up, it is important that the dentist remains more aware about new products so that their judgement about the selection of material remains successful. Materials which have not been thoroughly evaluated should be avoided, specially with clinical dentistry falling under Consumer Protection Act (CPA). I Research and development I iI Manufacturer/analysis Ideal requirements for clinical use: Thermal, optical, mechanical, chemical, biological Available materials and their properties are evaluated Launch of new I product Choice and selection of material by the dentist Critical assessment based on clinical performance I I H feedback to I